Horror Movie Night Flyer Set: Design Your Next Event
More Than Just a Template
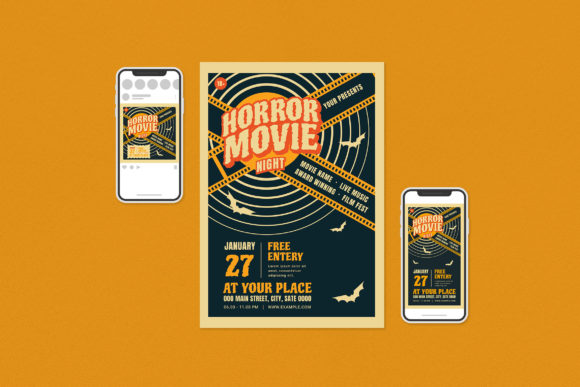
When you're planning a haunted house, a themed film screening, or a Halloween bash, the invitation sets the entire tone. The Horror Movie Night Flyer Set isn't just a collection of pre-made designs; it's a complete toolkit for creating that perfect, chilling first impression. Think of it as your creative foundation—a professionally designed starting point that you can fully make your own. The aesthetic leans into classic horror cinema: gritty textures, dramatic typography, and layouts that evoke suspense and intrigue. It’s designed to feel less like a corporate announcement and more like a movie poster you’d find in a video store’s horror section, full of personality and atmosphere.
This product is built for real-world use. You’re not getting a locked-down image you can’t edit. Instead, you receive a well-organized file where every element is on its own layer. The blood splatter, the title text, the background texture—you can adjust, remove, or replace any of it. This level of control is crucial for designers, event planners, and small business owners who need assets to align perfectly with their specific vision and branding. It’s a practical solution that respects your time and creative process.
Putting the Toolkit to Work
The true value of a resource like the Horror Movie Night Flyer Set lies in its versatility. Let's break down where and how you can use it effectively. For event marketing, it's a no-brainer. You can create posters for local theater productions, flyers for community center movie nights, or digital invites for a private screening. The included sizes—A4 for print and the Instagram formats—cover the most common promotional channels, ensuring your design looks sharp whether it’s on a bulletin board or in someone’s feed.
But the applications extend far beyond a single event. Consider using these templates as a springboard for broader brand identity work. A horror-themed podcast could use elements from the set for their cover art and social media graphics, creating immediate visual recognition. A niche blog or a YouTuber focusing on horror reviews can adapt the style for their thumbnails and channel banners. The consistent aesthetic helps build a recognizable brand in a crowded digital space. For entrepreneurs, it’s a way to produce professional-looking marketing materials without the overhead of hiring a designer for every small task. The organized PSD and AI files mean a designer you do hire can work efficiently if you need to scale up the project.
Key Features That Matter in Practice
Let’s look at the specifics that make this set a practical design asset. The fact that it’s available in both Adobe Illustrator (CC) and Photoshop (CS4 and later) formats is a significant advantage. Illustrator files are ideal for scalability—perfect if you need to resize the design for a massive banner or a tiny web icon without losing quality. Photoshop files are fantastic for detailed texture work and photo manipulation, which is often central to horror themes.
The inclusion of a help file is a detail that shows the creator understands the end user. It guides you through customization, saving you from guesswork. The use of free fonts is another thoughtful choice, as it keeps the final project cost down. The provided download links mean you’re not left searching for the typeface. Just remember, you’ll need to download and install those fonts separately before you start editing. The CMYK color mode at 300 DPI is non-negotiable for quality print output, ensuring your flyers won’t look pixelated or have off-colors when sent to a printer.
When using this set, think about your audience’s experience. A flyer for a family-friendly “spooky movie marathon” might use the templates but swap the more intense imagery for something whimsical. A hardcore horror film festival, on the other hand, would lean into the grit. The separate layers give you that freedom. You can adjust the visual hierarchy to make the date and location the most prominent elements, or make the movie title the star. This flexibility directly impacts readability and how effectively your message is communicated.
Making It Your Own: A Practical Guide
Before you dive in, here’s a straightforward approach to using the Horror Movie Night Flyer Set effectively. First, evaluate the fit. Does the overall style match the vibe of your project? If your brand is clean and minimalist, you might need to do significant alterations. If it’s edgy and thematic, you’re already on the right track.
Next, plan your customization. Open the file and turn off layers you don’t need. Replace the placeholder text with your own, paying close attention to kerning and leading if you change the font size. If you’re swapping images, choose high-resolution photos that match the existing style’s lighting and color grading. For print projects, always check the bleed area to ensure no critical information gets cut off.
Finally, think about font pairings if you’re adding new text elements. The set likely comes with a strong display typeface for headlines. Pair it with a more neutral sans serif font for body copy to maintain readability. Avoid adding too many competing styles. The goal is a cohesive look, not a chaotic one. And always do a final review on multiple devices if it’s for digital use, and a test print if it’s for physical materials. This set is a powerful tool, but like any tool, its effectiveness depends on the skill and intention of the person using it.